Wednesday, October 29, 2008

Christmas Cookies


Too early for Christmas Cookies you say? When I taught the Halloween cookies this week (see post below) I wanted to show some things you can do for other Holidays also. I can not wait to pull out my over 50 Christmas cutters and start playing!

Thanksgiving and Fall Cookies


I also did some new fall designs this year...see post below. I am going to do these again in November, and play with them a little more.

Halloween Cookies!


Here are the Halloween Cookies decorated...the cookies that I was baking on Sunday in the midst of the baking frenzy. I did a class on the royal icing technique that I use, and had to make a bunch of examples. I absolutely LOVE to decorate when there is no creative restraint! I was sitting up at 1 am detailing cookies and husband kept saying "Women...go to bed!" but I of course had to reply..."Hello! This is the fun part of all of this....the outlet, I do not want to sleep of all things!" I made the regular sugar cookie recipe, but then I also made "Martha's Chocolate Sugar Cookie Dough"....do not even ask Martha who. I will post the recipe because it is worth making. It makes a dough that does not spread or rise because of the lack of leavening product...the cookies are moist and deeply chocolate with a hint of Cinnamon. One note do not chill the dough as suggested unless you have biceps to spare...it is impossible to work with and not necessary. This I think makes a great contrast with the bright icing colors.


Martha's Chocolate Sugar Cookies:


3 cups sifted all-purpose flour, plus more for surface
1 1/4 cups unsweetened cocoa powder
1/4 teaspoon salt
1/2 teaspoon ground cinnamon
1 1/2 cups (3 sticks) unsalted butter
2 1/2 cups sifted confectioners' sugar
2 large eggs, lightly beaten
1 teaspoon pure vanilla extract
Directions
In a large bowl, sift together flour, cocoa, salt, and cinnamon. Set mixture aside.
Use an electric mixer to cream butter and sugar until fluffy. Beat in eggs and vanilla.
Add flour mixture; mix on low speed until thoroughly combined. Divide dough in half; wrap in plastic. Chill at least 1 hour.
Heat oven to 350 degrees. On a floured surface, roll dough to 1/8 inch thick. Cut into desired shapes. Transfer to ungreased baking sheets; refrigerate until firm, 15 minutes. Bake for 8 to 10 minutes, until crisp but not darkened. Cool on wire racks; decorate as desired

Sunday, October 26, 2008

Dilly, Dally


An addition to the previous post on my Sunday baking adventures...The Dilly Bread Rolls! For all of my baking you might get the idea that I am...well to put it blunt...large, and full...and well to a point I am...in belly only I hope (almost 6 months pregnant). But hear is the deal...I love to bake, but this doesn't mean I have to, or want to always eat everything that I bake...because I do not...this is what husbands, and kids, and friends are for! In fact, out of the batches and batches of baked goods today, the only thing I tasted (and LOVED for that matter) was the Dilly Bread Rolls. My point is just because you have a passion for baking does not mean you have to consume it all. Baking for me is a way to create something, to relieve stress, and to learn and try new things...adventures...and if I were to eat all those adventures I would be "creating" far more stress...the kind that makes it so that you can't touch your toes eventually...so this is why I might show up at your door step randomly with a plate full of cookies...help me out would you...I'm relieving my stress! :)


Dilly Bread (mom-in laws)

1 Tb. yeast

1/4 c warm water

1 cup small curd cottage cheese, heated to luke warm

1 T butter

2 T sugar

1 tsp. salt

1/4 baking soda

1 Tbs. minced onion (I had to use onion powder so I added only 1 tsp.)

2 t dill seed or weed (I used half weed, half seed)

1 egg

2 1/4 to 2 1/2 cups flour (I used bread flour)

**I added mine all to the bread machine and used the dough cycle...then took them out and shaped into rolls...let double in bulk and baked at 350 for 11 min. They were absolutly everything I wanted them to be...completly divine! BUT here is the original instructions:

Soften yeast in water, let stand 10 min. Add other ingredients except flour, beating thoroughly. Add flour, let rise until doubled, about 1 hour. Stir down and shape into loaf pan. Let rise about 1 hour and bake at 350 for 35-45 min. brush top with butter.

What a Sunday!


Let me start off by saying that the blog really does not do my baked goods justice...the pictures I take are awful! My camera is terrible and the lighting is always whatever I can muster up at 11 pm. So know that they are much better looking, and smelling, and tasting than they appear.


Okay...This by far was the busiest baking Sunday EVER! It happened completely by default. I knew that I would be making a ton of Sugar Cookies for the class I am teaching Tuesday. In order to get the base coat of icing dried to do detail work, I needed to have them baked today. I then decided that I really wanted "Mother-in-law's Dilly Bread" in roll form so I started those. I was then informed (rather late I must add 3 PM) that the girls (youth group for church) was in charge of the refreshments for that nights fireside at 7pm...this meant me (too late to call the girls/their moms:)


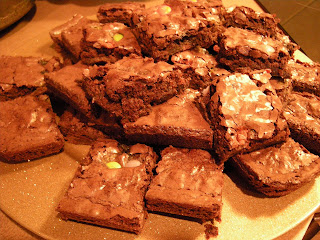
So I then made 2 dozen coconut cupcakes with buttercream frosting, and a jelly roll pan of M&M brownies. This still would not top the baking scale...I had this left over pumpkin in the fridge that was dying to be used and husband said..."I would just love if you made a pumpkin roll cake". So I did....with cream cheese filling. (I will add that picture and the recipe later) I then made a huge batch of homemade minestrone soup for the families dinner, and now I will be making the royal icing and heading in to frost the cookies.....I will not want to even look at the kitchen tomorrow...but Cinnamon Rolls sure have been sounding good, maybe......

Friday, October 24, 2008

THE Cookies


Okay...here is the Best Chocolate Chip cookie recipe I have ever tried to date (not that I will give up testing new ones!) This recipe comes from , "The New York Times". The recipe made it around the baking blogs for awhile and everyone raved about it. I held out baking it until now. I usually alter recipes quite a bunch when I bake, however this time I followed the recipe down to the exact. The result was a perfect, salty and sweet, chewy with crisp edges chocolate chip cookie. I would definitely make these again. I used a combination of semi-sweet chocolate chunks, Ghiradelli milk chocolate chips, and 60 percent cacao chips by Gheradelli. Do not skip the sea salt...it really enhances the chocolate. And YES, the custom blend of flours DOES make a difference! This is a "special occasion" chocolate chip cookie!
New York Times Chocolate Chip Cookies Adapted from NYTimes.com
2 cups minus 2 tablespoons (8 1/2 ounces) cake flour
1 2/3 cups (8 1/2 ounces) bread flour
1 1/4 teaspoons baking soda
1 1/2 teaspoons baking powder
1 1/2 teaspoons coarse salt
2 1/2 sticks (1 1/4 cups) unsalted butter
1 1/4 cups (10 ounces) light brown sugar
1 cup plus 2 tablespoons (8 ounces) granulated sugar
2 large eggs
2 teaspoons vanilla
1/2 pound each Milk, Semi-sweet, and 60 % Chocolate chunks
Sea salt
Sift flours, baking soda, baking powder and salt into a bowl. Set aside.Using a mixer fitted with paddle attachment, cream butter and sugars together until very light, about 5 minutes. Add eggs, one at a time, mixing well after each addition. Stir in the vanilla. Reduce speed to low, add dry ingredients and mix until just combined, 5 to 10 seconds. Drop chocolate pieces in and incorporate them without breaking them. ***I did not chill my dough***
Press plastic wrap against dough and refrigerate for 24 to 36 hours.(If you want to scoop them while they are still soft, that's okay!) Dough may be used in batches, and can be refrigerated for up to 72 hours. When ready to bake, preheat oven to 350F degrees. Line a baking sheet with parchment paper or a nonstick baking mat.
Sprinkle lightly with sea salt and bake until golden brown but still soft in the middle, 9 to 11 minutes. **They will continue to bake after you take them out of the oven. If they look slightly shiny in the center of the cookie, but slightly brown on the edges, they are done. Be careful not to over bake them!

Tuesday, October 21, 2008

SMU Cake


So tonight I tried the world famous "New York Times Chocolate Chip Cookie"...it lived up to its name. Most likely the best recipe I have tried, but more to come on that later...because I was to busy eating...savoring every morsel.... of them to take a picture, so I will post recipe and picture tomorrow. For tonight I ran across this picture of an SMU Cake I did for a graduation this spring. I loved the finished cake. I used chocolate for the SMU and the Mustang...I played around with a newly acquired clay gun to make the tassels, and the cap was a rice crispy treat. I never heard anything from the client....I hate it when they do not drop me a quick e-mail to let me know if they liked it....But then I wonder how many times I forget to tell people how pleased (or not ...hopefully not) with the things they make/do for me I am ...like the amazing Banana Bread that a friend gave me tonight. I have to remember to thank her and tell her that my daughter....when faced with my "world famous..." cookie or the banana bread, chose the banana bread hands down, and said that it was the best she had ever had!

Monday, October 20, 2008

Pumpkin Chocolate Chip Cookies


I have a favorite franchise bakery in Utah...it's called Kneaders. They have the best salads...and brownies, and even live up to my high standards in chocolate chip cookies...most visits....when not pregnant. I found this recipe on a Utah news cast and had to try it out. The cookies were called "Kneaders Pumpkin Chocolate Chip Cookies". From the pictures online the cookies looked less cakey and more chewy than the regular pumpkin cookies, so I thought I would give them a try. (Another gift I would make to bring to family this past weekend). Well, the cookies were very good...but alas they were as cakey as any home-made pumpkin cookies are. I am wondering if my change in the recipe had anything to do with the outcome (but I think not) You see the original recipe called for 1 and 1/2 CUPS BUTTER! In comparison to the amount of flour and eggs I thought this sounded like way to much...so I down-sized the butter by a half a cup and only added 1 Cup butter. All in all I think they were a good cookie, but not much different than the recipe I had already on hand.

Kneaders Pumpkin Chocolate Chip Cookies

1 1/2 c butter (I used only 1 cup)

1 c brown sugar

1/2 c sugar

2 eggs

1 15 ounce can pumpkin

2 c flour

1 TB baking powder

1 TB Cinnamon

1/2 tsp. nutmeg

1/2 tsp. salt

1/4 tsp. ginger

1 c chocolate chips

Combine all dry ingredients and set aside. Beat sugar, butter and eggs until fluffy. Add pumpkin and slowly add in dry ingredients. Fold in chocolate chips last. Bake on parchment lined cookie sheet in oven set at 400 degrees for 12-15 min.

Caramel Apples


This past weekend we went to visit family. I wanted to bring them something hand-made and fall...I made them Caramel Apples. I used the home-made Caramel recipe that I had previously posted for Caramel Popcorn. I also used Granny Smith apples to give them a little bit of tart to combat the sweetness. I double dipped them in the Caramel, and then rolled some in milk chocolate toffee bits, drizzled with dark chocolate. In others (for the kids) I decorated them in M&M's and/or Candy Corn, and sprinkles. I also let my kids make some for themselves and they had them eaten in their entirety all in one night!

Thursday, October 16, 2008

Camping Cake


I did this cake for a friend this weekend. It was hers husbands birthday and he likes to camp....He is not a sweet-eater (weird I know) so she wanted only a small cake to help the family celebrate. The cake might have been small in size However I hope she thought it tasted awesome. I went to special lengths to make it taste extraordinary...The cake was vanilla, I made homemade sliced strawberry filling, which was layered on top of a homemade cream cheese filling ...and then iced all in buttercream. The decorations are all edible, the "rocks and logs" are fondant and the "sand" is graham cracker crumbs.

Sunday, October 12, 2008

Baby Boy


I did this cake on Friday for a little boy baby shower. I loved the way the Teddy Bear turned out. He looked good enough to pick up and hug. I have come up with a new edible sugar glue which has helped my fondant work. The cake was Vanilla White Chocolate, with a filling of White Chocolate Buttercream and a layer of raspberry. The White Chocolate Filling also has a thin layer of pure White Chocolate over the raspberry...to give it a slight crunch. Yum!


With the left over white choc. buttercream and the extra cake from leveling it, we made "Halloween Cake Balls". I wish I would have taken a picture of them. My daughter did a fantastic job and they all said they were very tasty. She did ghost, pumpkins, witches, skeletons,and mummy's. We got the idea off of the "Bakerella" web site. She is the lady that pioneered the cake balls on Martha....hers looked slightly neater than ours! :)

Texas vs OU


I did these cookies for a lady having a football party this weekend...apparently this was the "big"collage football weekend around here...everyone was decked out in their teams colors, and the game could not be avoided...I went to Costco during the last 5 min. or so, and it was blaring out on every TV LOUD!
should have got a better picture, I really need a better camera..Also because I wanted the cookies to be as fresh as can be, I made the dough, baked the cookies, and decorated them all in the same night. I then woke up at 5:30 am to have them bagged and ready to go for a friend to pick them up at 7 am...hence the bad lighting for the picture.

Wednesday, October 8, 2008

More Cake


So on the days I neglect to bake...or more likely do not take a picture... I will post another cake picture. So today I made wonderful, and rather healthy, peanut butter cookies with dark chocolate...but I ate...and I did not stop to take a picture. I know I will be making them again in the near future, so I will wait and tell you all about them later....Now for the cake, this cake was done for a pre-school graduation celebration. All decorations are edible and made out of fondant. I am pretty sure we stuck with a very neutral palette of vanilla and chocolate layers, iced in buttercream.


Tuesday, October 7, 2008

Caramel Brownies


So I promised to let you know what I decided to do with my left-over caramel from Sunday.....I do not think Caramel Popcorn is worth using up my treat quota for the day, so I did not even try it...you know only use the treat allowance on something perfectly honorable and worthy.


Thus comes the Caramel Brownies!


The recipe is a very easy one, found in most every recipe book around...it is the one that you begin with a cake mix. My adaption, that really sent them over the top, is that I used my new homemade caramel. These Brownies could have even the toughest of chocoholics satisfied!


In fact after pulling them out of the oven and waiting for them to cool...I had the most perfect, rich one of all....and then suffered with a sugar overload headache for the rest of the night....growing a human can really mess you up! Well, because I apparently cannot hold my own with chocolate richness now that I am growing this sweet little human, I have not dared even look at the brownies again... and they sit in the refrigerator...lonely. Anyone care to come and take them off my hands?


Chocolate Caramel Brownies:


1 chocolate cake mix (I used german choc.)


2/3 c evaporated milk, divided


1/2 c melted butter


1 c chocolate chips


1 pkg caramels (milk maid brand...or homemade!)


Mix cake mix, melted butter and 1/3 c evaporated milk until crumbly (I had to add a bout 1/4 c extra flour...I used whole wheat pastry flour to help the dough not be as sticky) Press 1/2 of mixture in 9x13 pan and bake for 8 min. at 350 degree's. Meanwhile, combine caramels and 1/3 cup evaporated milk, melt and pour over baked crust. Top caramel portion with chocolate chips and remain dough return to oven and bake for an additional 18 to 20 min. Let cool and cut into bars. Store in refrigerator.

Monday, October 6, 2008

Wonderful Weekends!


We had a weekend at home enjoying each others company, and our church general conference on TV....We have had a family tradition for the last two years, that twice yearly at conference we make homemade caramel popcorn...


I was actually hoping that the kiddo's might forget this time around, but alas as I was still lying in bed early Sunday morning I hear one say, "YEAH! It's caramel popcorn time!" So I was not off the hook. I have the best, most decedent, chewy caramel corn recipe you could ask for. I got it from a neighbor a very long time ago. It is rich and should be used on plain, freshly popped popcorn. We did not have plain popcorn, I discovered on Sunday morning, so I had to use the "Movie Theatre Butter" microwave version that I cringe at even buying for them. (husband likes BUTTA and lots of it!) So I went back and forth, do I really let them indulge their little bodies with enough fat and sugar to feed an elephant in one handful of popcorn...or do away with one of their apparently cherished childhood memories? I made the corn. The girls helped and it was more memories in the making. I rationalized it a little by going easy on the caramel and saving the rest of it in a pint jar to use either on ice cream...or you will see what working out 7 days a week lately... led me to do with it later.

Here is the recipe for the perfect caramel, to go on popcorn...or anything else your heart desires:

Caramel Popcorn:

1/2 c butter

1 c corn syrup

1 can sweetened condensed milk (I used low-fat)

2 c brown sugar

Melt butter, add syrup and bring to a boil. Add milk and sugar and bring to boil, stir constantly for about 5 to 8 minuets or until soft ball stage. Pour over popcorn.

**I added raw almonds, you know to make it healthy:)

Friday, October 3, 2008

Candy Cake


Here is a cake done for a little girl that told her mom..."I love candy and I want a candy cake". This was a really fun cake to make. The "lollipops" are made of fondant. Before she picked it up, I added big rainbow swirled lollipops that stuck out the top and really made for the cake. I covered the cake board with skittles. Can you say sugar rush!

Thursday, October 2, 2008

Brown Sugar Chocolate Chip Cookies


This is a recipe for chocolate chip cookies that turn out soft and chewy. The main difference in this recipe, is that it calls for only brown sugar.... and you melt the butter. The batter is very different due to the melted butter. It looks wet and sticky, but is firmer than expected when you feel it. I have always made 1/2 the recipe and it was plenty. I go through my waves with which cookie recipe I prefer. The kids really like this one.

Brown Sugar Chocolate Chip Cookies:
2 1/2 c flour
1 tsp. baking soda
1 tsp. baking powder
3/4 c melted butter
1 1/2 c packed brown sugar
1 egg
2 tsp. vanilla
1 c chocolate chips

Combine butter, brown sugar and egg. Slowly blend in dry ingredients and add chocolate chips. Bake at 350 for 8 to 10 min. Cookies will be golden brown.